【React】從 zustand 原始碼了解狀態管理
Zustand 的介紹可以先看這篇,這一篇主要是透過閱讀 zustand 的原始碼來了解它的運作原理。會想要寫這篇是因為使用套件大家都已經習以為常,但套件到底幫我們做了什麼事相信大部分的人(包括我)平常是不會特別去了解的,想要看套件的原始碼,很多又太艱澀難以咀嚼。
而 zustnad 就是一個很好入門的套件,它的原始碼不多,大部分都蠻容易看懂(撇除 Typescript 的部分),看完也會讓你對狀態管理有更深的了解,可以說是初次閱讀原始碼的好選擇,就讓我們來好好了解 zustand 是如何做到 React 狀態管理吧!
原始碼解析
zustand 的核心原始碼主要是在 src 底下的 react.ts 以及 vanilla.ts 這兩支檔案,這邊以 v4.5.1 的版本為例。
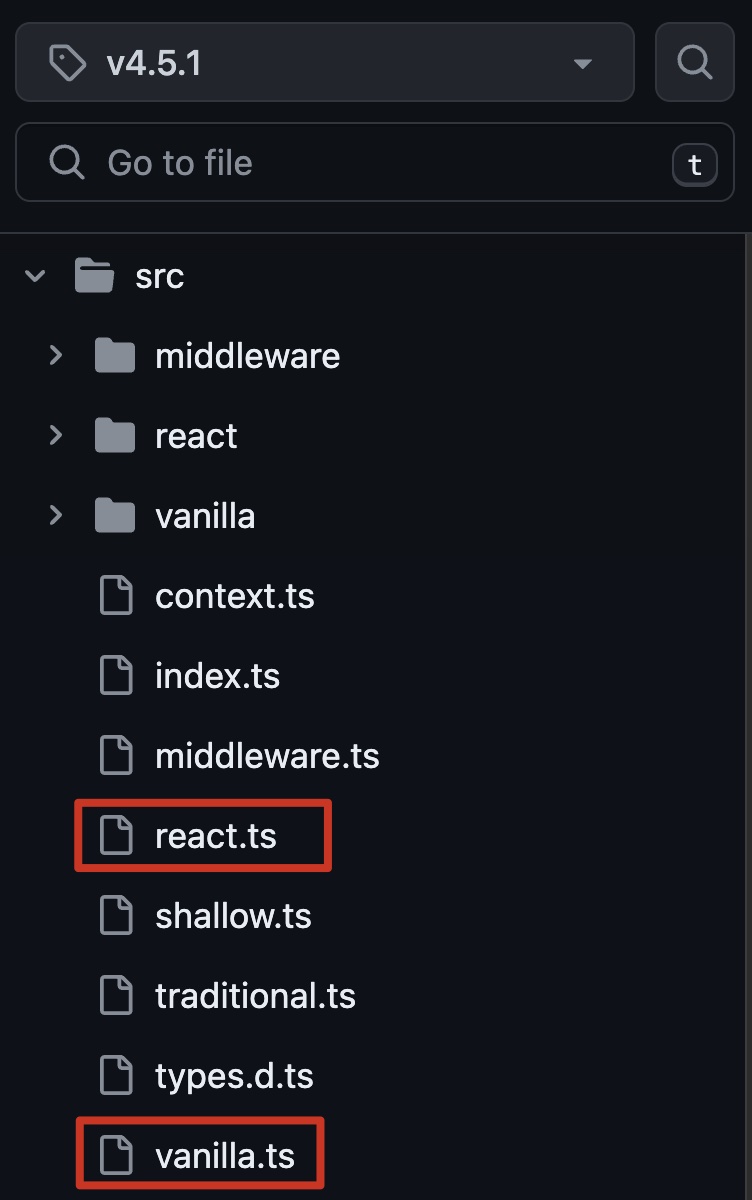
而這兩支檔案總共有三個主要的 function:
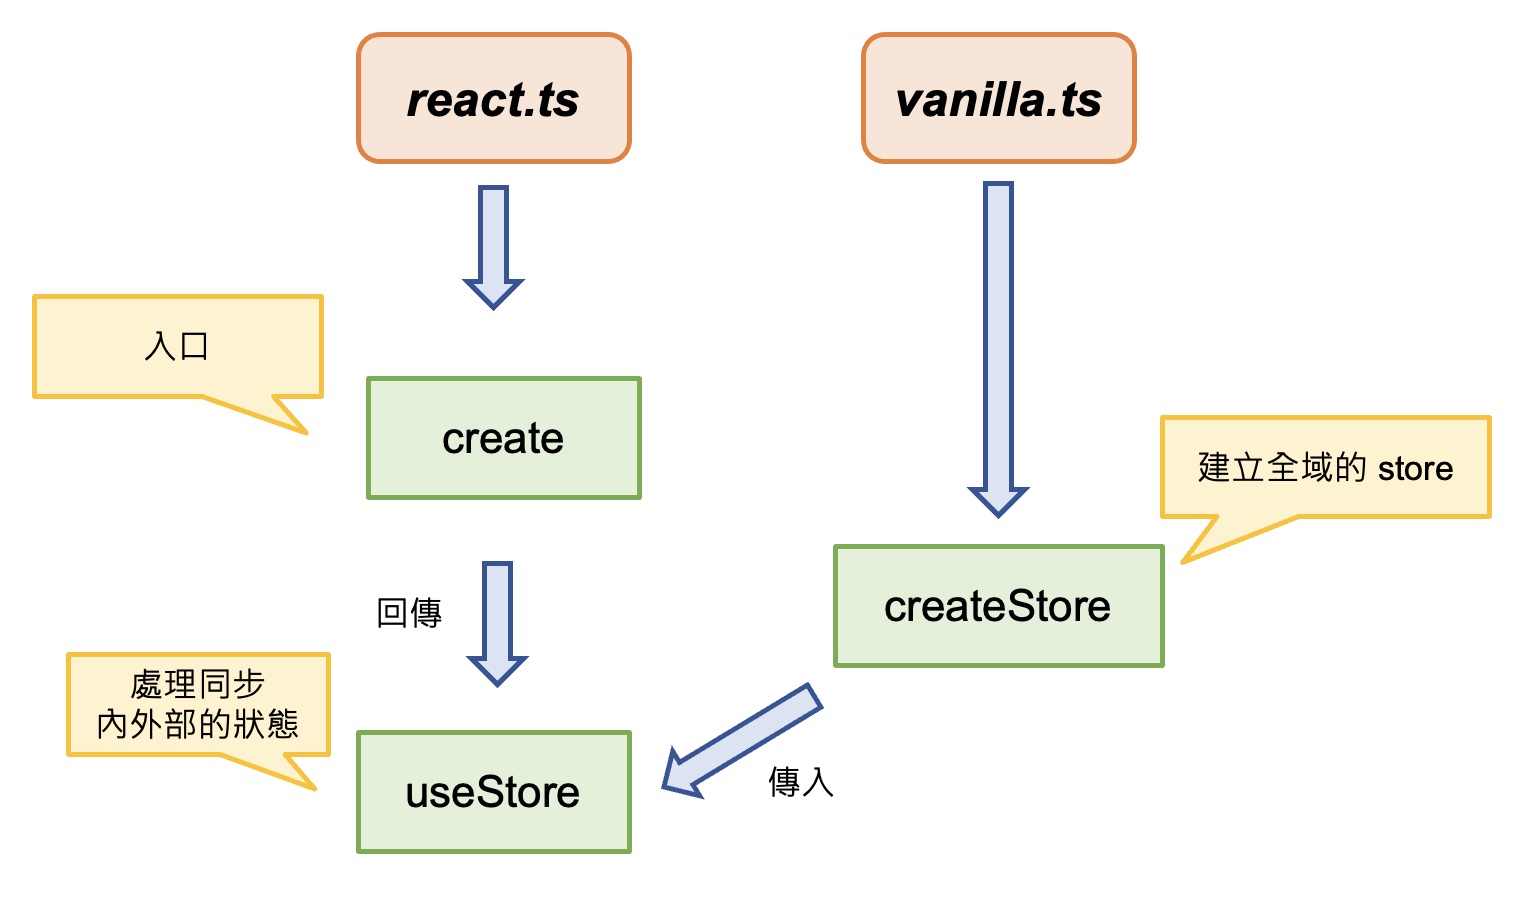
create(react.ts):zustand 的核心 function,用來建立 store。useStore(react.ts):處理同步 React 內部及外部的 state 狀態。createStore(vanilla.ts):建立全域的 state 及建立訂閱模式。
他們之間的關聯性會像這樣:
create (react.ts)
首先來看一下 create 的部分:
export const create = (<T>(createState: StateCreator<T, [], []> | undefined) =>
  createState ? createImpl(createState) : createImpl) as Create;
他回傳了一個 createImpl 的 function,這個 function 定義了一個叫 api 的物件,是呼叫 createStore 的回傳值。
然後建立一個 useBoundStore 的 function,這個 function 會回傳 useStore ,並且把 api 物件傳入 useStore。
const createImpl = <T>(createState: StateCreator<T, [], []>) => {
  if (
    import.meta.env?.MODE !== "production" &&
    typeof createState !== "function"
  ) {
    console.warn(
      "[DEPRECATED] Passing a vanilla store will be unsupported in a future version. Instead use `import { useStore } from 'zustand'`."
    );
  }
  const api =
    typeof createState === "function" ? createStore(createState) : createState;

  const useBoundStore: any = (selector?: any, equalityFn?: any) =>
    useStore(api, selector, equalityFn);

  Object.assign(useBoundStore, api);

  return useBoundStore;
};
createStore (vanilla.ts)
接著來看一下 createStore:
export const createStore = ((createState) =>
  createState ? createStoreImpl(createState) : createStoreImpl) as CreateStore;
一樣回傳了一個 createStoreImpl 的 fucntion:
const createStoreImpl: CreateStoreImpl = (createState) => {
  type TState = ReturnType<typeof createState>;
  type Listener = (state: TState, prevState: TState) => void;
  let state: TState;
  const listeners: Set<Listener> = new Set();

  const setState: StoreApi<TState>["setState"] = (partial, replace) => {
    // TODO: Remove type assertion once https://github.com/microsoft/TypeScript/issues/37663 is resolved
    // https://github.com/microsoft/TypeScript/issues/37663#issuecomment-759728342
    const nextState =
      typeof partial === "function"
        ? (partial as (state: TState) => TState)(state)
        : partial;
    if (!Object.is(nextState, state)) {
      const previousState = state;
      state =
        replace ?? (typeof nextState !== "object" || nextState === null)
          ? (nextState as TState)
          : Object.assign({}, state, nextState);
      listeners.forEach((listener) => listener(state, previousState));
    }
  };

  const getState: StoreApi<TState>["getState"] = () => state;

  const getInitialState: StoreApi<TState>["getInitialState"] = () =>
    initialState;

  const subscribe: StoreApi<TState>["subscribe"] = (listener) => {
    listeners.add(listener);
    // Unsubscribe
    return () => listeners.delete(listener);
  };

  const destroy: StoreApi<TState>["destroy"] = () => {
    if (import.meta.env?.MODE !== "production") {
      console.warn(
        "[DEPRECATED] The `destroy` method will be unsupported in a future version. Instead use unsubscribe function returned by subscribe. Everything will be garbage-collected if store is garbage-collected."
      );
    }
    listeners.clear();
  };

  const api = { setState, getState, getInitialState, subscribe, destroy };
  const initialState = (state = createState(setState, getState, api));
  return api as any;
};
首先可以看到他宣告了一個 state 變數,這個變數是用來存放全域的 state 值,然後建立了一個 listeners 的 Set 物件,用來存放訂閱的 function。
createStore 的重點在於他建立了與訂閱模式相關的 function:
setState:用來更新 state 的 function。getState:取得目前的 state。getInitialState:取得初始的 state。subscribe:訂閱 state 的變化。destroy:銷毀訂閱。
getState 跟 getInitialState 都蠻好理解的,就是取得目前的 state 跟初始的 state。
setState 有做一層判斷,如果新的值跟舊的值不同(使用 Object.is 判斷),就會去 forEach listeners 裡面儲存的所有 function,這些 function 我稱之為更新函式,後面會再說明更新函式是什麼。
subscribe 就是把更新函式加入 listeners 裡面,並且回傳一個 function 用來取消訂閱。
useStore (react.ts)
最後一個 function 是 useStore 可以說是 zustand 的核心 function:
export function useStore<TState, StateSlice>(
  api: WithReact<StoreApi<TState>>,
  selector: (state: TState) => StateSlice = identity as any,
  equalityFn?: (a: StateSlice, b: StateSlice) => boolean
) {
  if (
    import.meta.env?.MODE !== "production" &&
    equalityFn &&
    !didWarnAboutEqualityFn
  ) {
    console.warn(
      "[DEPRECATED] Use `createWithEqualityFn` instead of `create` or use `useStoreWithEqualityFn` instead of `useStore`. They can be imported from 'zustand/traditional'. https://github.com/pmndrs/zustand/discussions/1937"
    );
    didWarnAboutEqualityFn = true;
  }
  const slice = useSyncExternalStoreWithSelector(
    api.subscribe,
    api.getState,
    api.getServerState || api.getInitialState,
    selector,
    equalityFn
  );
  useDebugValue(slice);
  return slice;
}
他把剛剛建立的 getState 跟 subscribe 傳入 useSyncExternalStoreWithSelector,並回傳了它的結果。
那這個 useSyncExternalStoreWithSelector 又是怎麼辦到的呢?這就要提到 react 18 新增的 hook useSyncExternalStore。
useSyncExternalStore
useSyncExternalStore 是 react 18 新增的 hook,用來同步 React 內部及外部的 state 狀態。這是什麼意思呢?我們都知道 React 在更新 UI 畫面時,會透過 useState 來更新 state,並進行 re-render,但如果我今天不想用 useState 想要隨便建立一個物件儲存 state,那我要怎麼告訴 React 這個物件底下的值改變時,幫我重新進行畫面更新呢?這就是 useSyncExternalStore 的作用拉!
const snapshot = useSyncExternalStore(
  subscribe,
  getSnapshot,
  getServerSnapshot
);
會傳入三個參數:
subscribe:訂閱 state 的變化。getSnapshot:取得當前最新的值。getServerSnapshot:取得 SSR 的初始狀態(可選)。
而因為這個 hook 是 React 18 新增的,所以為了讓之前的版本也可以做使用,所以有另外把這個 hook 拉出一個獨立的 package use-sync-external-store,透過這個 package 的原始碼,我們可以一窺究竟這個 hook 大概是怎麼實作的。
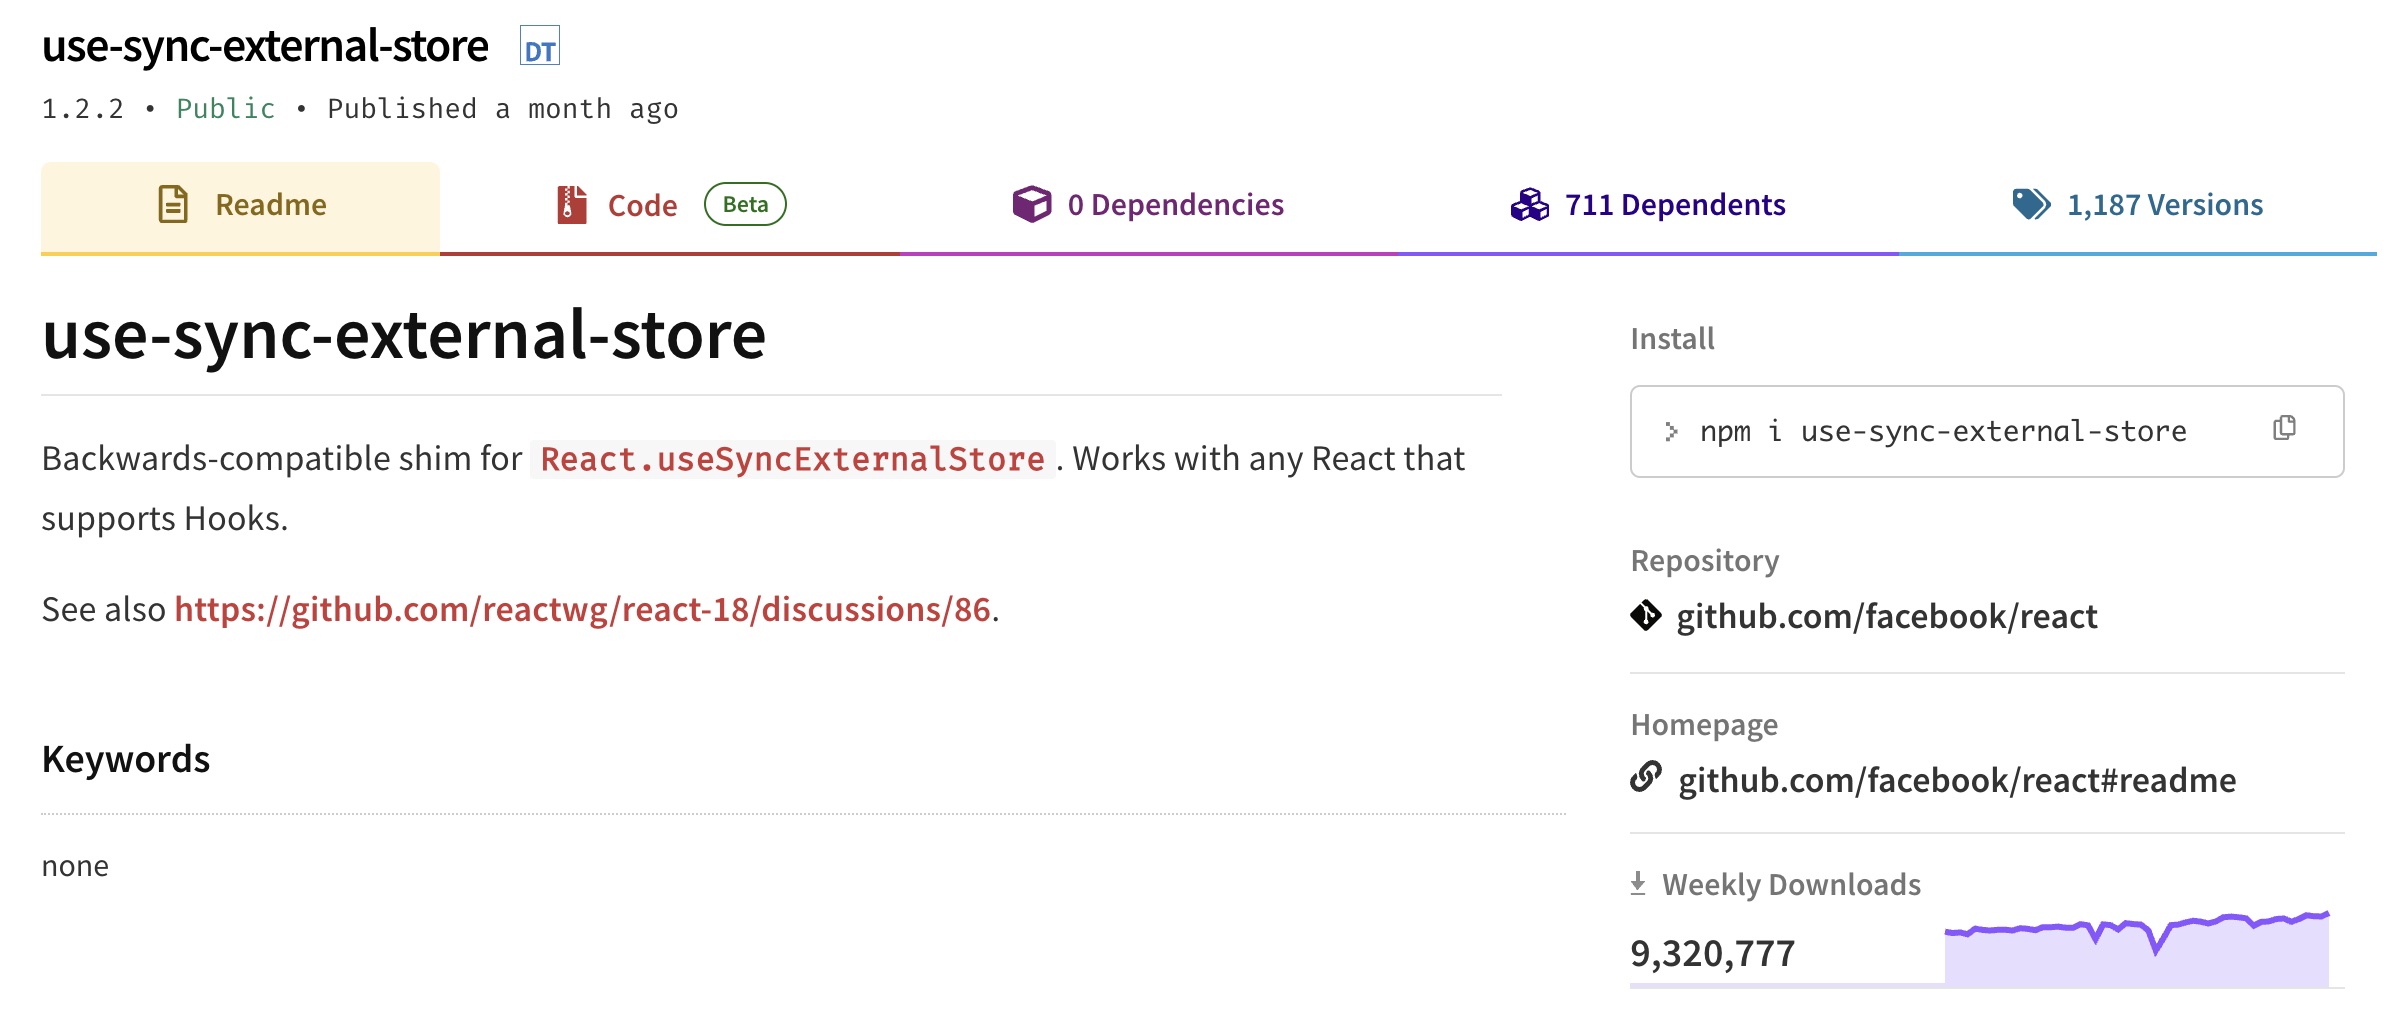
原始碼位置是在 react package 底下的 useSyncExternalStoreShimClient.js 裡面,這邊只列出重點程式碼:
export function useSyncExternalStore<T>(
  subscribe: (() => void) => () => void,
  getSnapshot: () => T,
  getServerSnapshot?: () => T,
): T {
  const value = getSnapshot();
  const [{inst}, forceUpdate] = useState({inst: {value, getSnapshot}});

  useEffect(() => {
    if (checkIfSnapshotChanged(inst)) {
      forceUpdate({inst});
    }
    const handleStoreChange = () => {
      if (checkIfSnapshotChanged(inst)) {
        forceUpdate({inst});
      }
    };
    return subscribe(handleStoreChange);
  }, [subscribe]);

  useDebugValue(value);
  return value;
}
可以看到其實是透過 useState 及 useEffect 來達成的,useState 的部分是為了讓 React 重新 render,他實作了一個強制更新的方法,因為他每次 setState 的時候都是傳入一個新的物件,而 React 內部在判斷是否要 re-render 時,兩個物件會判定為不同,所以就會重新 render。
而在 useEffect 的部分,它建立了一個 handleStoreChange 的 function,裡面會先判斷目前的值是否有改變,如果有改變就會呼叫 forceUpdate 來進行強制更新,而這個 handleStoreChange 也就是我們前面說的 更新函式,最後透過 subscribe 把這個 function 加入 listeners 裡面。
zustand 內部訂閱流程圖
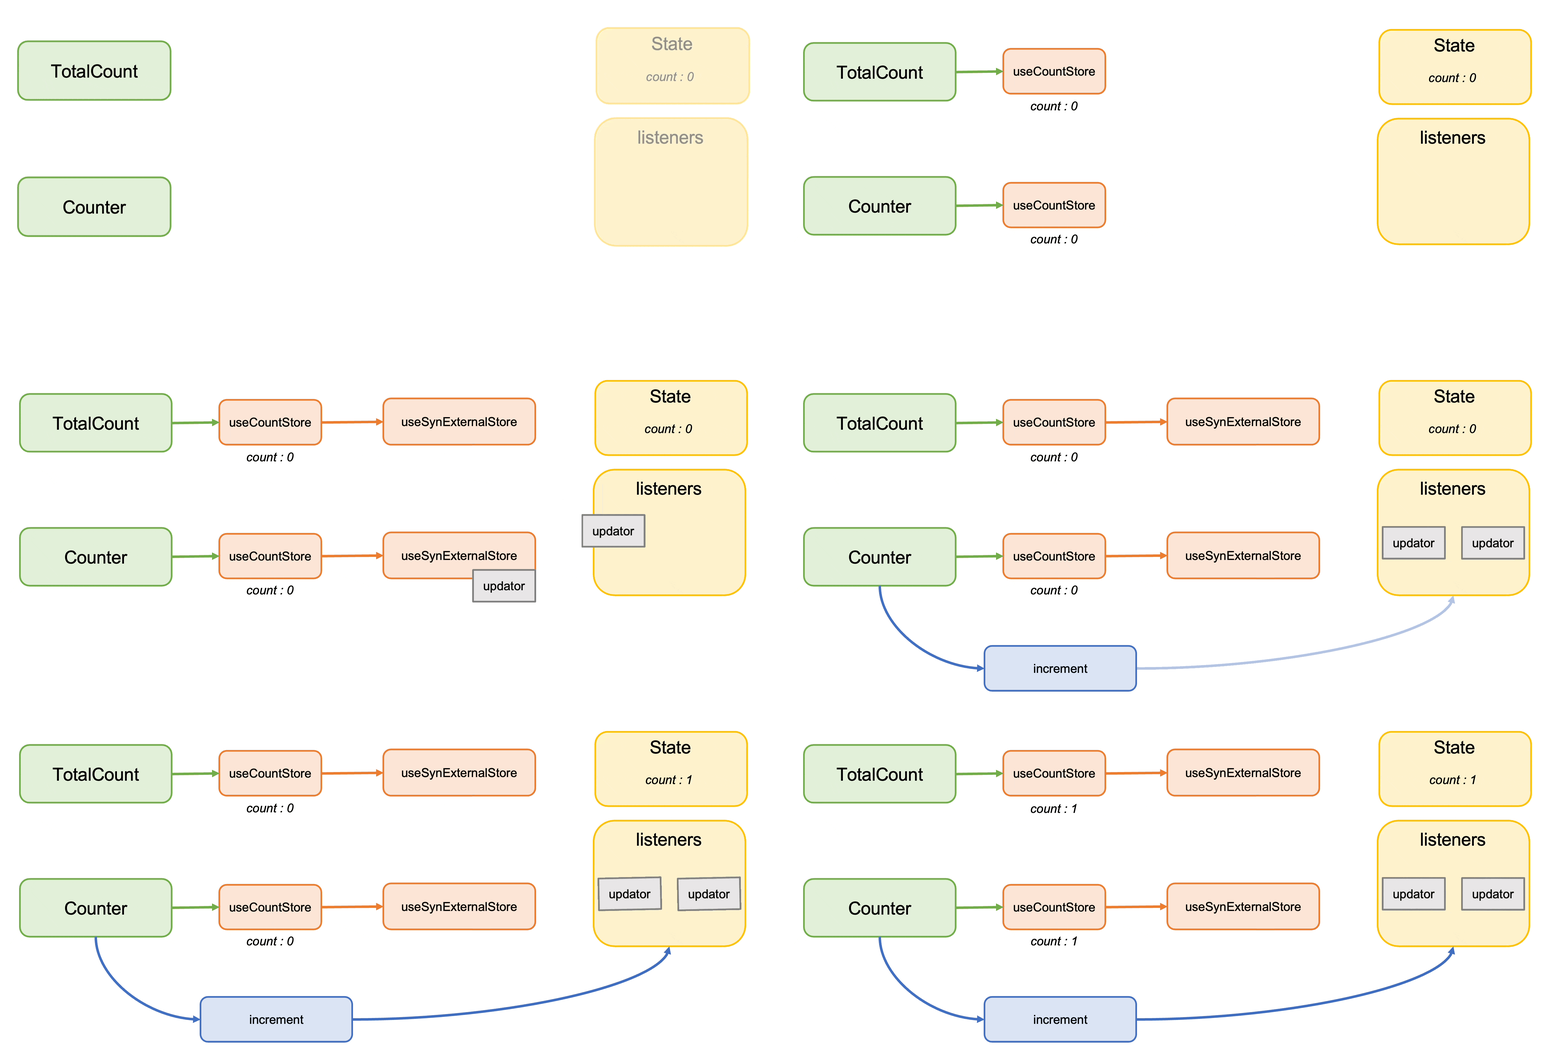
下面是更新函式被加進 listeners 的流程:
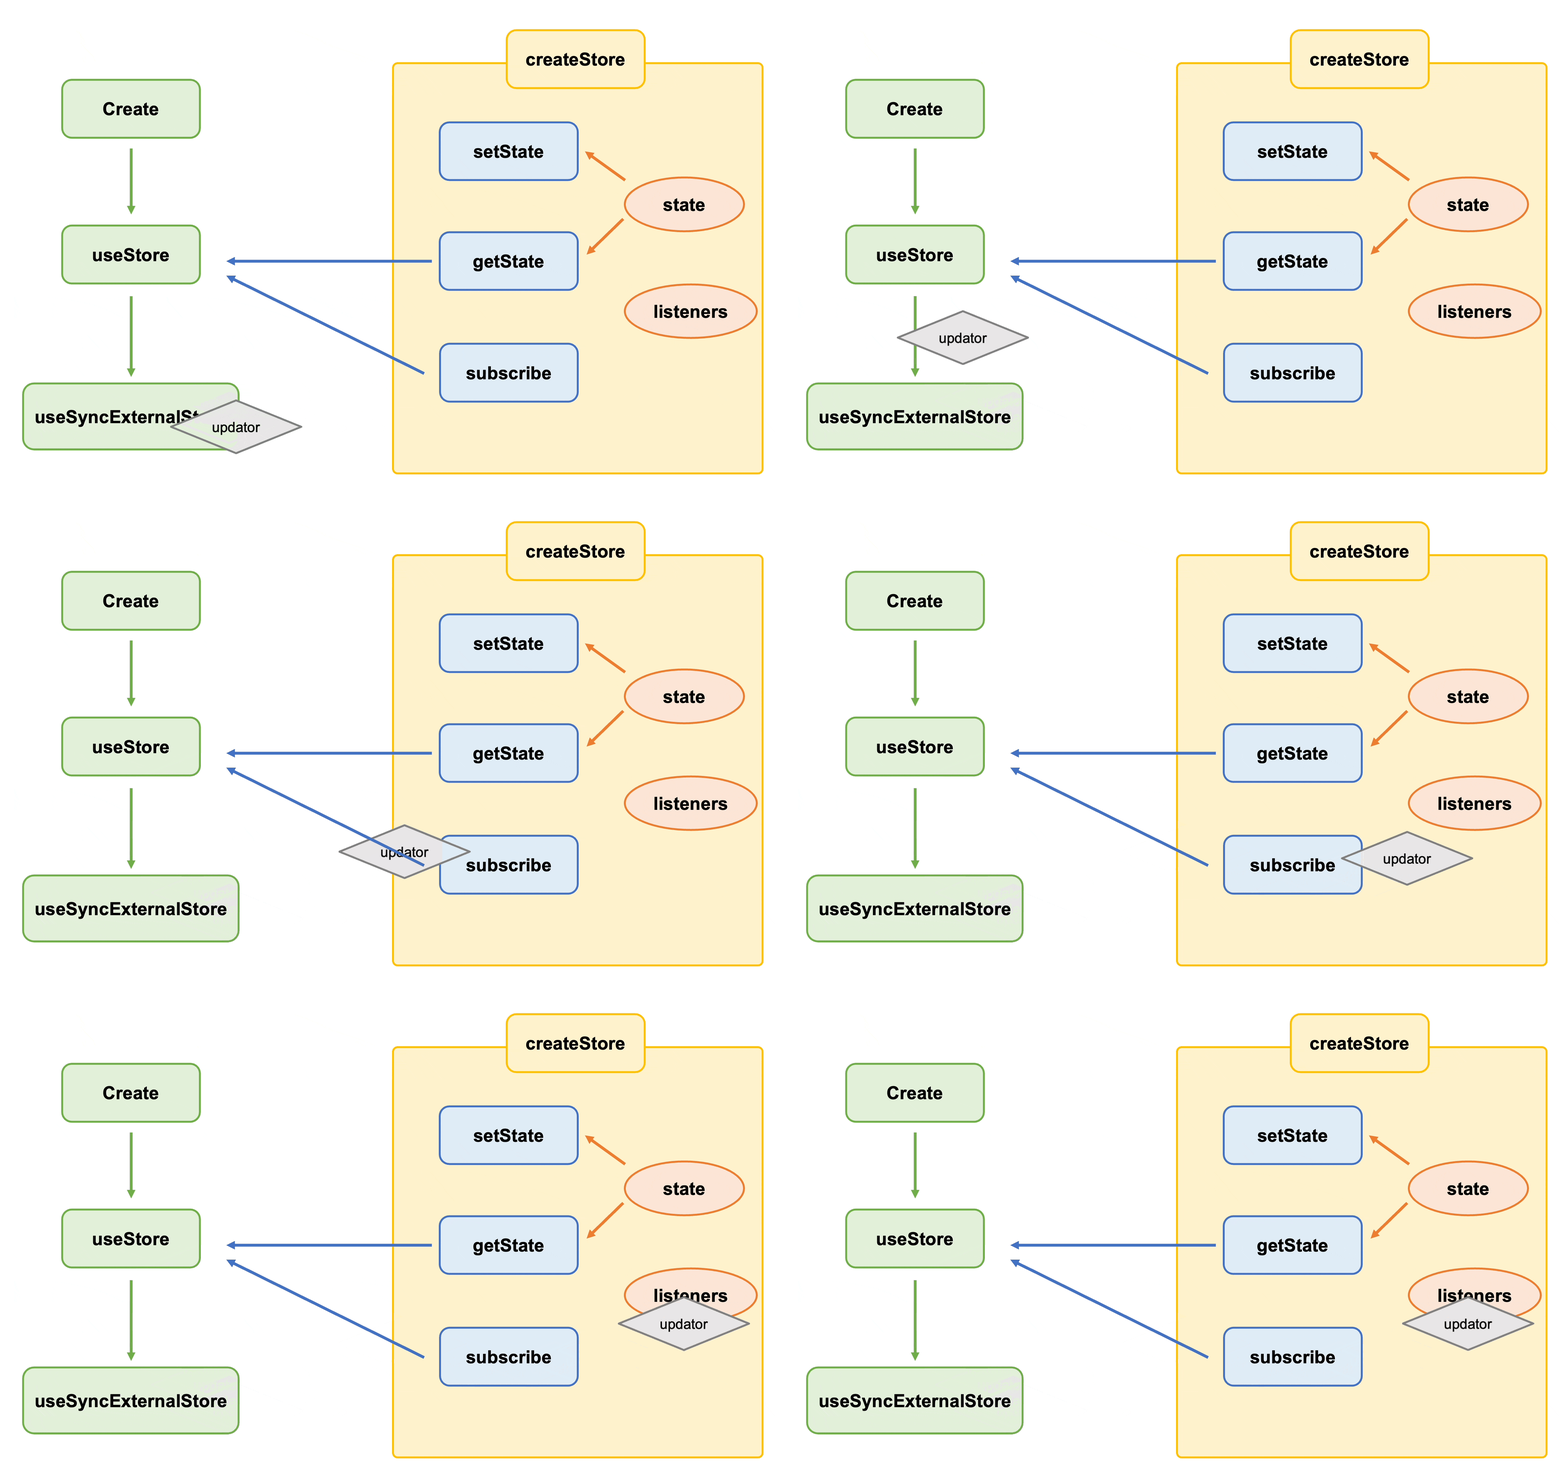
zustand 更新 state 流程圖
接下來讓我們來看一下如果今天有多個元件使用了同一個 zustand 的 state 時,是如何進行更新的。現在有兩個元件
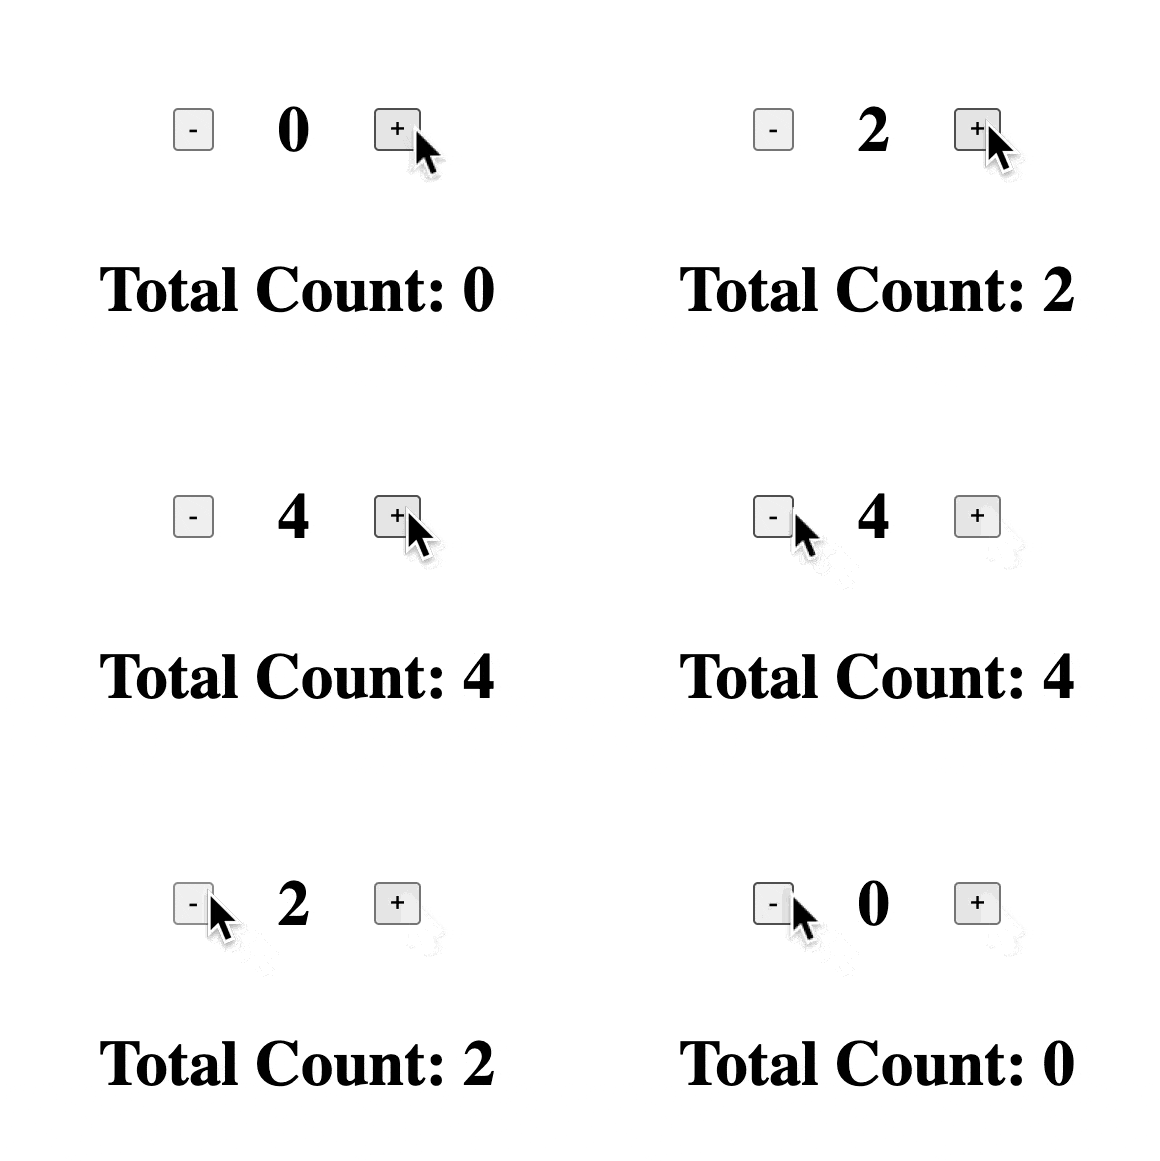
import { useCountStore } from "./store";
export default function Counter() {
  const { count, increment, decrement } = useCountStore();
  return (
    <div className='counter'>
      <button onClick={decrement}>-</button>
      <h1>{count}</h1>
      <button onClick={increment}>+</button>
    </div>
  );
}
import { useCountStore } from "./store";
export default function Total() {
  const { count } = useCountStore();
  return (
    <div>
      <h1>Total Count: {count}</h1>
    </div>
  );
}
這兩個元件都呼叫了 useCountStore 來取得 count 的值,前面提到 useCountStore
會呼叫 useSyncExternalStore 來把 更新函式 加入到 listeners
裡面,所以當畫面渲染時,listeners 會有兩個 updator 函式,而當 Counter 呼叫了 increment 或 decrement 時,會觸發 zustand
內部的 setState,這時候會先更新 state 的值,然後執行 listeners 裡面的所有 updator
函式,這樣就會讓所有使用了這個 state 的元件都重新 render。
zustand 濃縮版
如果把 zustand 的原始碼只保留核心功能,會變成這樣:
- create
export const create = (createState) => {
  const api = createStore(createState);
  return () => useStore(api);
};
- createStore
const createStore = (createState) => {
  let state = {};
  const listeners = new Set();

  const setState = (partial) => {
    const nextState = partial(state);
    state = { ...state, ...nextState };
    listeners.forEach((listener) => listener());
  };

  const getState = () => state;

  const subscribe = (listener) => {
    listeners.add(listener);
    return () => listeners.delete(listener);
  };

  state = createState(setState);

  const api = { setState, getState, subscribe };
  return api;
};
- useStore
import { useSyncExternalStore } from "react";

export function useStore(api) {
  const entireState = useSyncExternalStore(api.subscribe, api.getState);

  return entireState;
}
zustand 架構模式
Zustand 的在 Flux inspired practice 有提到:
Although Zustand is an unopinionated library, we do recommend a few patterns. These are inspired by practices originally found in Flux, and more recently Redux, so if you are coming from another library, you should feel right at home.
意思是 Zustand 本身並沒有強制要求使用者遵循任何特定的架構模式,但是建議使用者可以參考 Flux 或 Redux 的一些實踐方式。Redux 在學 React 的時候應該都有聽過,那這個 Flux 是什麼呢?
Flux
Flux 是一種架構模式,那什麼是架構模式呢?比較常聽到的例子就是 MVC,架構模式的目的是用來幫助我們可以更好的組織程式碼,讓程式碼更加容易維護、擴充。而 Flux 則是從 MVC 所啟發出來的一種架構模式。
MVC 模式最早由 Trygve Reenskaug 在 1978 年提出,並且在 University of Oslo 有留下研究報告,他把應用程式分為三個部分:
- Model: 負責處理資料
- View: 負責顯示畫面
- Controller: 負責處理 View 的事件,也會說是 View 及 Model 之間的橋樑
MVC 的好處是可以讓程式碼更加模組化,每個部分都有自己的責任,不會互相干擾,也讓程式碼更容易維護。
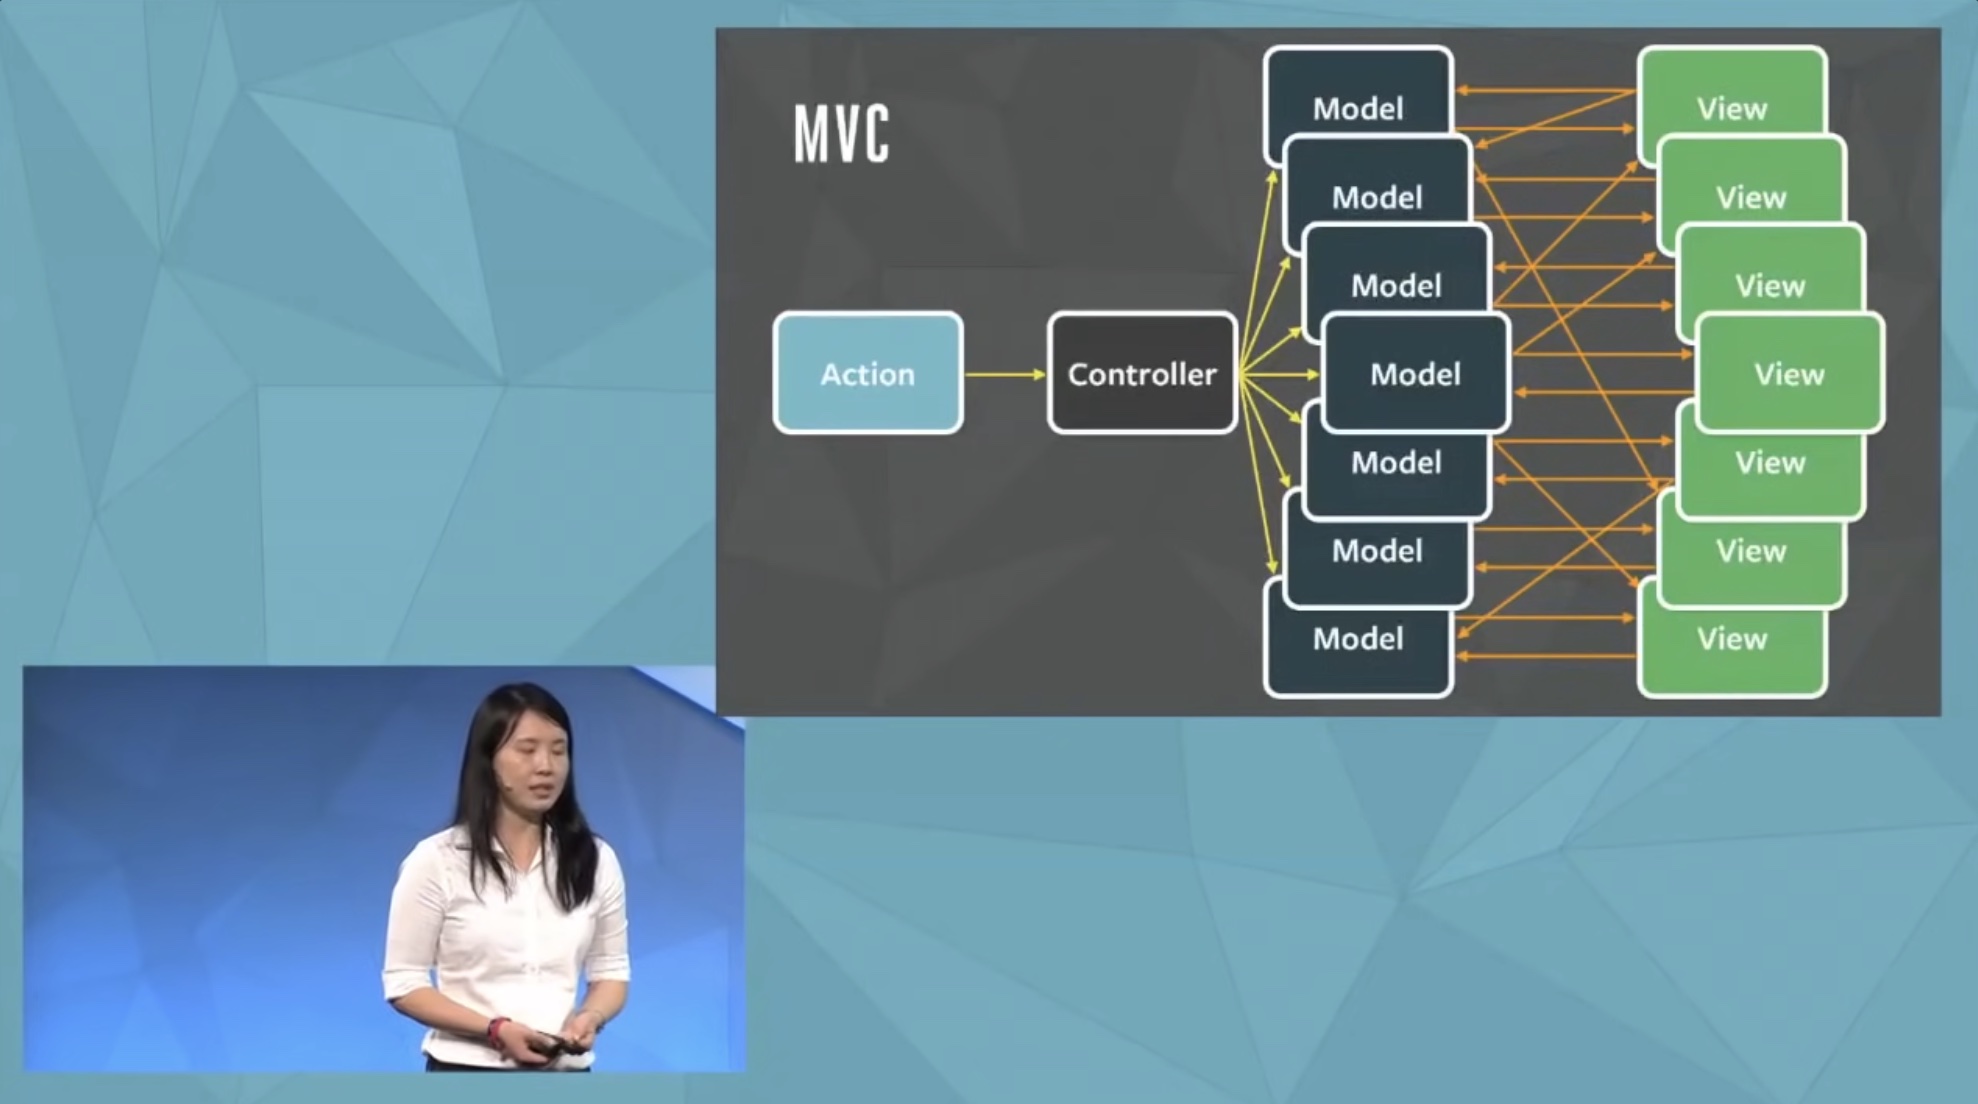
雖然 MVC 的架構定義了三個部分的職責,不過對於三個部分之間的溝通方式並沒有明確的定義,所以在實際應用時,可能會有不同的實作方式,這也是為什麼有很多不同的 MVC 變體,像是 MVP、MVVM 等等,而 Flux 的出現就是為了解決 MVC 在資料流上不好追蹤的問題。
Flux 是 React 在 2014 年的 Hacker Way conference 上提出的概念,為的就是解決 Facebook 在使用 MVC 架構所遇到的問題。Facebook 最初是使用雙向綁定的方式進行資料傳遞,但隨著專案越來越大,資料流變得越來越複雜。
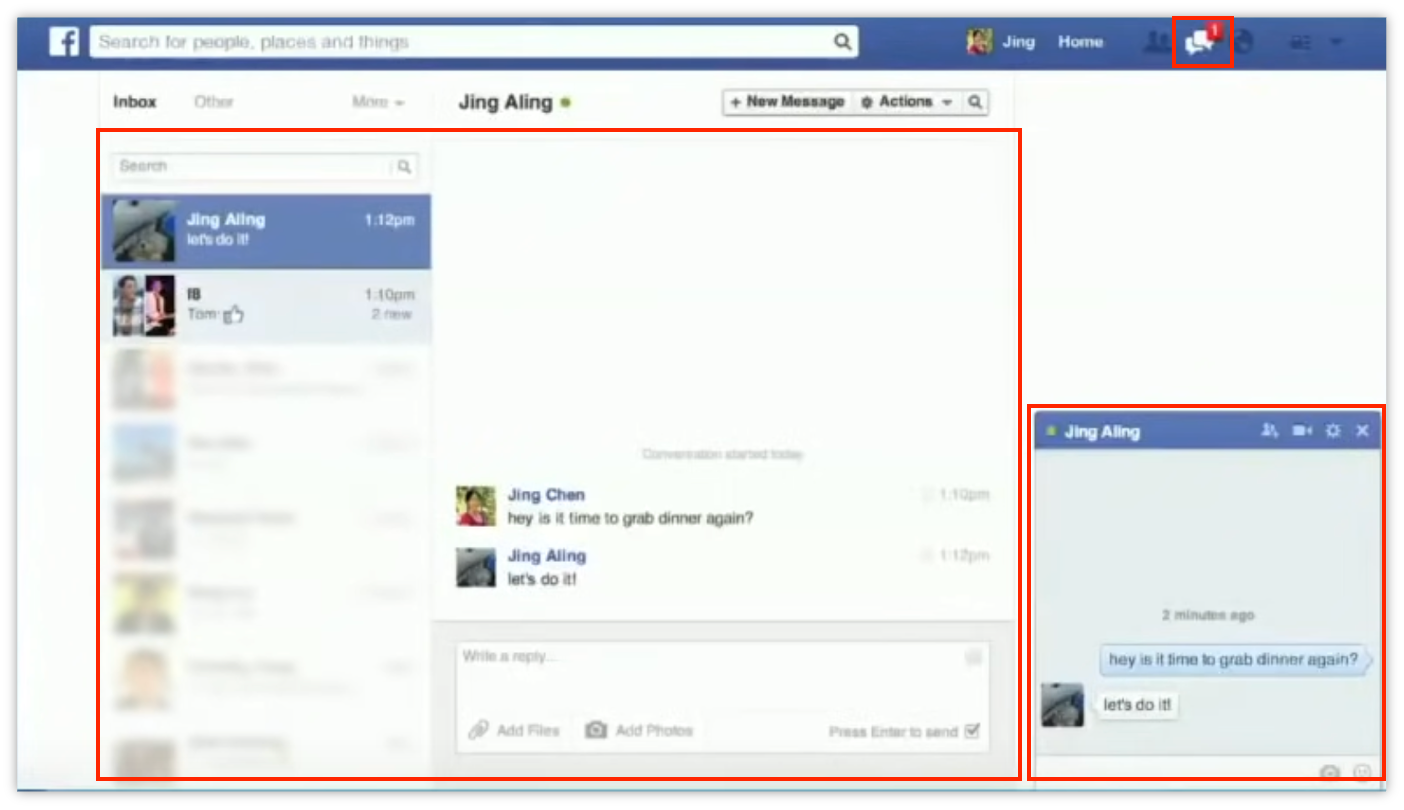
meta 工程師舉的實際例子是當初做 message chat 的時候,一開始只有一個區塊跟訊息有關,但後來越來越多功能會對訊息的數量造成影響。
而遇到的 bug 就是未讀訊息的數字不準確,因為很多的區塊都有可能會影響到未讀訊息的數字,所以要追蹤到底是哪個區塊造成的 bug 就變得非常困難,而 meta 每次遇到這個 bug 都是去解決那些 edge case (邊界案例),沒有真的解決核心問題,所以導致每次新增功能都會有新的 bug 產生。
他們認為這是因為 MVC 的雙向綁定造成的,當資料流變得越來越複雜時,就會變得非常難以追蹤,所以提出了 Flux 的單向資料流的架構。
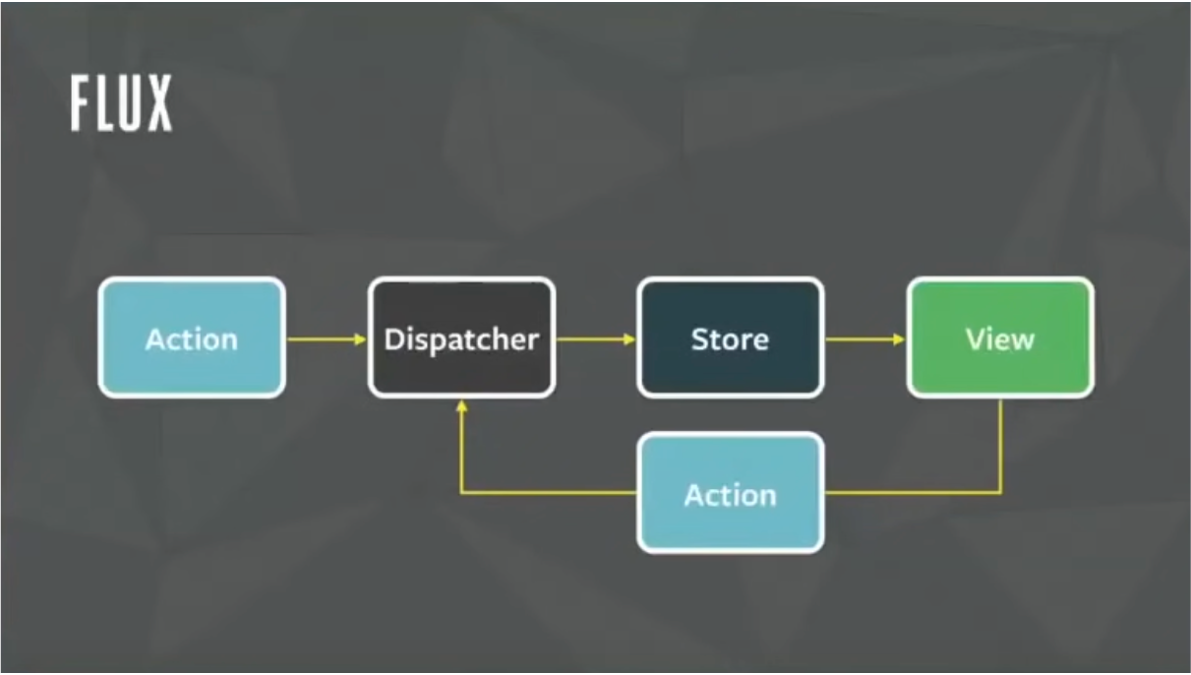
Flux 將資料流的傳遞分為四個部分:
- Action:物件結構包含行為定義及傳遞的資訊
- Dispatcher:負責分發 Action 的函式
- Store:儲存資料及回應 Action 的行為
- 顯示 Store 提供的資料畫面
Redux
在提出 Flux 架構的同時,meta 也提出了一個叫 Flux 的 library,不過並沒有受到太多的關注,直到隔一年 Dan Abramov 提出了基於 Flux 概念實作的 library Redux,這個 library 後來成為了 React 最受歡迎的狀態管理 library 之一。
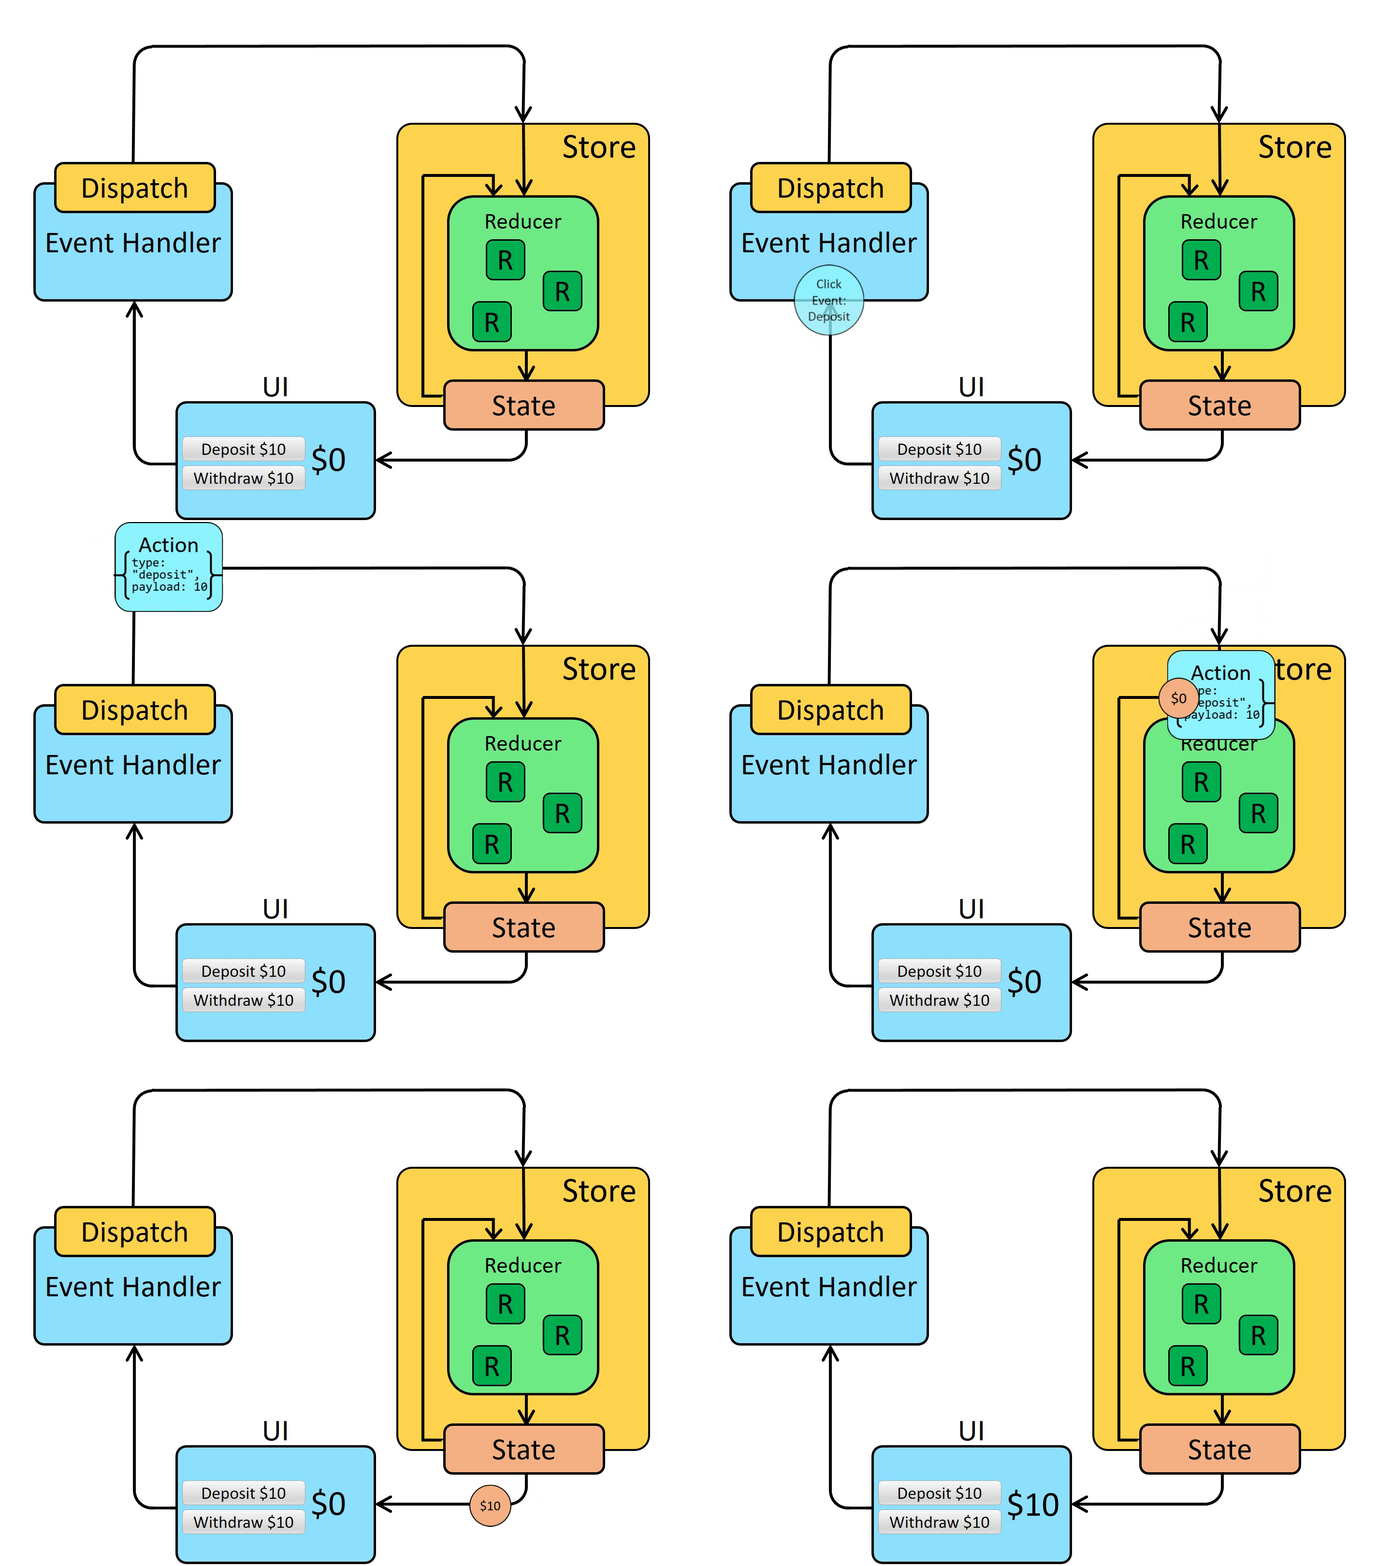
在 Redux 的官網可以明確的看到整個 redux 的資料流:
總結
其實光看 Flux 及 Redux 的圖,會覺得好像跟 MVC 沒有什麼差別,也是定義個別的職責,View 跟 Model 分開,也有類似 controller 的東西。不過重點在於它更加嚴謹的定義了資料流的方向,讓資料更好的統一,雖然 MVC 架構也辦得到這件事,但並不是每個人都會這麼做,所以我認爲 Flux 還是跟 MVC 有所區別。
回到 zustand,之所以能夠寫的那麼簡潔方邊使用,是因為他並不是完全的實作了 Flux,他捨棄了 Flux 中的 Action 及 Dispatcher,只保留了 Store 的部分,在 DX (Developer Experience) 上的體驗就比較好,而雖然不是嚴謹的 Flux 架構,但還是遵循著最基本的單向資料流的原則,讓我們可以更好的進行管理狀態。
總而言之,如果不想使用 React 原生的 useContext,而學習 Redux 的入門又有點太高,zustand 是一個很好的選擇,在做 side project 或是小型專案絕對是非常夠用的,而且也可以讓你對狀態管理有更深的了解!
有任何問題或是內容有誤的地方,歡迎在底下留言 ~